| RadiosityTut1MV.html RadiosityTut2MV.html RadiosityTut3MV.html RadiosityTut4MV.html |
MV's Cinema 4D | |||||||||||||||||||||||||||||||||||||||||||||||||||||
| This page will examine a Cinema scene with a wide variety of light sources. After finding a reasonably good radiosity setting for a still image, we are going to prepare the scene for baking the radiosity into the walls, floor, and ceiling. This will allow us to substantially reduce overall render times and render a long scene animation in far less time than would otherwise be required. | ||||||||||||||||||||||||||||||||||||||||||||||||||||||
 |
||||||||||||||||||||||||||||||||||||||||||||||||||||||
| In this room we have six light sources. TV, lamp, lava lamp, neon sign, and two lights coming in through the venetian blinds. | ||||||||||||||||||||||||||||||||||||||||||||||||||||||
 |
||||||||||||||||||||||||||||||||||||||||||||||||||||||
| The main light source is this yellow lamp. It uses a single omni light with soft shadow. The opening in the top and bottom allow for some direct light on both the floor and ceiling. The lamp shade has a 10% transparency, so it also will allow ten percent of the direct light to bleed through it. The bleed light will be tinted yellow because I used yellow in the transparency channel of the shade material. The same material uses banji in the luminance channel. This gives it the backlit appearance and this backlighting will cause the shade to radiate texture driven (secondary) illumination. Since the shade's banji illumination is driven by the brightness of the omni, it's very much like a real lamp and will give our scene both direct and secondary illumination. | ||||||||||||||||||||||||||||||||||||||||||||||||||||||
 |
||||||||||||||||||||||||||||||||||||||||||||||||||||||
| Lava Lamp: This uses a standard spotlight to illuminate the three lava balls having a standard color texture with banji added to the luminance channel. The lava balls then illuminate the scene through radiosity. Like the lamp, the intensity of the secondary illumination is driven by the intensity of the standard light, but in this case non of the standard lights' rays are hitting the scene directly. Very much like a real lava lamp! | ||||||||||||||||||||||||||||||||||||||||||||||||||||||
 |
||||||||||||||||||||||||||||||||||||||||||||||||||||||
| Next we have a TV set. This is a strictly a texture driven light source. I've given it a very high illumination setting and a blue cast. TV color temperature is the same as outdoor light which makes it blue compared to indoor color temperatures. | ||||||||||||||||||||||||||||||||||||||||||||||||||||||
 |
||||||||||||||||||||||||||||||||||||||||||||||||||||||
| Neon light: This uses a luminant texture and glow. Radiosity from the texture contributes green light to the scene. | ||||||||||||||||||||||||||||||||||||||||||||||||||||||
 |
||||||||||||||||||||||||||||||||||||||||||||||||||||||
| The last two light sources are two spots aimed through the window. One is amber colored (streetlight) and one is colored blue (moonlight). They provide direct illumination to the floor and wall as well as indirect illumination through radiosity. The blinds use SLA's banji shader in the luminance channel to get a translucency effect. | ||||||||||||||||||||||||||||||||||||||||||||||||||||||
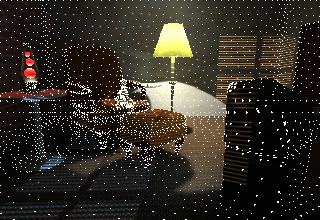
| Since this scene is very high contrast and uses a variety of small texture based light sources we know that we're probably going to need a high stochastic sample value. This image was rendered using 800 rays per sample. Click the picture to see the render result and then the radiosity pass by itself. | ||||||||||||||||||||||||||||||||||||||||||||||||||||||
 |
 |
|||||||||||||||||||||||||||||||||||||||||||||||||||||
| 0: 10:11 | ||||||||||||||||||||||||||||||||||||||||||||||||||||||
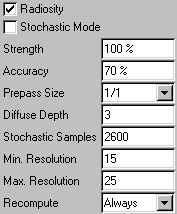
| Here the stochastic samples have been increased to 2600. The radiosity is slightly more defined, more accurate, but whether it's worth the extra render time is debatable. On the other hand, if you're not in a hurry you could increase higher for even better results. | ||||||||||||||||||||||||||||||||||||||||||||||||||||||
 |
 |
|||||||||||||||||||||||||||||||||||||||||||||||||||||
| 0:36:57 | ||||||||||||||||||||||||||||||||||||||||||||||||||||||
|
|
||||||||||||||||||||||||||||||||||||||||||||||||||||||
 |
||||||||||||||||||||||||||||||||||||||||||||||||||||||
| In the sample scene you will find a camera already set up with a spline track and a camera target. I've animated them so the camera will make a complete loop around the room. Since the light isn't going to change during the course of the animation, we can use the Single Animation Solution. Using the Single Animation Solution, radiosity sample points generated for one frame will be used in the next with only those areas that newly come into view generating new sample points. This means that instead of taking 3000 minutes on my Dual Athlon 1800, (300 x 10 minutes), the animation will render in just 236 minutes, approximately 15 times faster in this case. Click the link below to view the movie rendered using the settings shown above. I've also made available the radiosity only version of the movie if you're interested. | ||||||||||||||||||||||||||||||||||||||||||||||||||||||
|
|
||||||||||||||||||||||||||||||||||||||||||||||||||||||
|
|
||||||||||||||||||||||||||||||||||||||||||||||||||||||
| What do you think? Not bad for under a minute per frame with radiosity, but this tutorial is about improving that time, and one more thing. Did you notice the artifacts on the wall with the window, under and around the window? These artifacts aren't due to any render setting, they're just artifacts. Trying to get rid of them by changing render settings could have you pulling your hair out. Baking the radiosity into the walls, floor and ceiling will eliminate the possibility of artifacts and speed up your final render. | ||||||||||||||||||||||||||||||||||||||||||||||||||||||
|
|
||||||||||||||||||||||||||||||||||||||||||||||||||||||
| To bake radiosity we are going to use what is commonly referred to as camera mapping, or what Cinema calls Frontal Mapping. To do so we need to create cameras that will frame areas to bake. The room consist of four walls, a floor and a ceiling. We are going to bake four times. The floor, the ceiling, walls 1&2, and walls 3&4. | ||||||||||||||||||||||||||||||||||||||||||||||||||||||
 |
||||||||||||||||||||||||||||||||||||||||||||||||||||||
 |
||||||||||||||||||||||||||||||||||||||||||||||||||||||
| Please open the Scenefile if you haven't already and examine the selection maps I've already given to the object called Room. These selections were done to map the materials onto the different surfaces, and in anticipation of baking radiosity. Enter polygon selection mode and then double click the first selection triangle (floor) and choose restore selection. Use an editor camera (not the Main Camera) to look at the scene in Wireframe mode. You should be able to see the floor selection highlighted in red. Check the other selections now to confirm that the correspond to the other walls and ceiling. Next open your render setting and select an output size of 1000x1000. | ||||||||||||||||||||||||||||||||||||||||||||||||||||||
 |
Now let's bake the floor first. Create a new camera and name it FloorCamera. Switch to top view and place the camera in the center of the room. Then use the coordinates manager to zero the H and B rotations. Enter -90 in the P value. The camera should now be in the center of the room pointing straight down. Using four way view position the camera so that it is in the center and top of the room, inside the room. Switch the perspective view to the FloorCamera, choose the Quick Shading display mode and use the lens zoom tool (the triangle in XL7) to zoom out until you can see the entire floor. Dolly the camera away from the floor as far as you can without leaving the room and frame the floor as much in the center of view as possible, making sure that it's entirely within the frame of the render, paying attention the render safe lines. It should look something like the image on the right. | |||||||||||||||||||||||||||||||||||||||||||||||||||||
| In the scenefile you'll see that I've separated the room geometry from the rest of the objects which I've grouped into a null called Objects under rendertag influence. In our floor bake render, we don't want to see anything but the floor, but we still need to have all the object contribute to the radiosity solution. To do so select the Objects Under Rendering Influence group null and give it a render tag (File-New Tag-Render Tag). Double click open the render tag and deselect Seen by Camera., as shown. The objects won't render but their radiosity influence on the scene will. | ||||||||||||||||||||||||||||||||||||||||||||||||||||||
 |
||||||||||||||||||||||||||||||||||||||||||||||||||||||
| As long as we're baking radiosity we might as well bake good values, so I've increase the stochastic sample value to 2600. In render settings, save the render as floor, and most importantly, save the radiosity only pass. In this tutorial we're only going to use the radiosity pass, but it is possible to use the full image too in a different method of baking. Rendering both gives you the most flexibility later on. As shown in the image above, enable Multipass Rendering and select just Radiosity from the channels selection menu. Give it a path name as Floor (cinema will add radiosity to the end of the name so it will read Floor_radiosity). In Format select TIFF. Make sure you select the Floor camera as you render camera and render. | ||||||||||||||||||||||||||||||||||||||||||||||||||||||
 |
The finished render should look something like this. Click on this image to cycle through three different views, the render dots, the full image, and the radiosity pass image. Place the radiosity pass, the file called Floor_radiosty into your textures folder. We going to render all the baked textures first and then assign them to the Room geometry. Copy the camera called FloorCamera and rename it CeilingCamera. It's essential that you don't change or delete the FloorCamera. Using the coordinates manager make so it's pointing straight up at the ceiling, then dolly away from the ceiling until you almost pass through the floor. Make sure the ceiling is framed up like the floor was previously, and render new passes called Ceiling. | |||||||||||||||||||||||||||||||||||||||||||||||||||||
| 0:22:00 | ||||||||||||||||||||||||||||||||||||||||||||||||||||||
| After you've finished the Ceiling pass it's time to set up the Walls1&2 render. Switch your render resolution to 2000x800. Duplicate the Ceiling camera and rename it Walls1&2 camera. It's essential that you don't change or delete the Ceiling camera, as you will need to use it again later. Place it in the center of the room pointing at the corner where walls 1&2 meet. Then Dolly back the camera as far as you can without dollying outside of the room and then zoom in until walls 1&2 are framed up as shown below. | ||||||||||||||||||||||||||||||||||||||||||||||||||||||
 |
||||||||||||||||||||||||||||||||||||||||||||||||||||||
 |
||||||||||||||||||||||||||||||||||||||||||||||||||||||
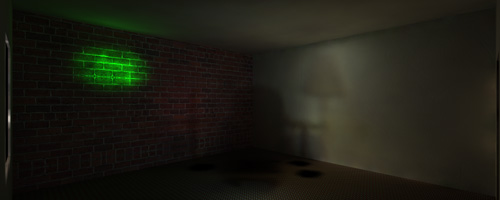
| Below is the result of the radiosity pass. Click the image to see the standard pass. | ||||||||||||||||||||||||||||||||||||||||||||||||||||||
 |
||||||||||||||||||||||||||||||||||||||||||||||||||||||
| 0:27:27 | ||||||||||||||||||||||||||||||||||||||||||||||||||||||
| Lastly, copy the Walls1&2 camera and rename it Walls3&4 camera, framing it so walls 3&4 are framed as Walls 1&2 were previously. You should get a result that looks like the render below. | ||||||||||||||||||||||||||||||||||||||||||||||||||||||
 |
||||||||||||||||||||||||||||||||||||||||||||||||||||||
| That completes the rendering of the radiosity maps. The next step is to apply them to the room as textures. Because we are going to UV map textures to the Room object, we have to subdivide the room to insure that the mesh is dense enough to UV map without texture slippage. Select the object called room, enter polygon mode, select all polygons, then subdivide the mesh using a factor of 3. You should get a result that looks like the one below. | ||||||||||||||||||||||||||||||||||||||||||||||||||||||
 |
||||||||||||||||||||||||||||||||||||||||||||||||||||||
 |
||||||||||||||||||||||||||||||||||||||||||||||||||||||
|
|
||||||||||||||||||||||||||||||||||||||||||||||||||||||
| First we will apply the Floor_radiosity image to a new texture that will be applied to the floor. First make sure that the files Floor_radiosity, Ceiling_radiosity, Walls1&2_radiosity, and Walls3&4_radiosity are in your textures folder. Next make sure that the render resolution setting matches the original render setting at the time you rendered from the camera. In this case, return the render resolution setting to 1000x1000. This is vital because if not done the camera mapping process will not work. | ||||||||||||||||||||||||||||||||||||||||||||||||||||||
| 1) Create a new material and call it Floor_radiosty. Deactivate all channels except Luminance. Click the image button and navigate to Floor_radiosity.
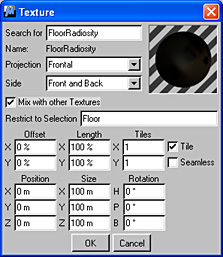
2) Make the camera called FloorCamera the active view. 3) Drag the Floor_radiosity material to the object Room. 4) In the popup texture dialog choose Frontal Projection and select the Mix with other Textures box option as shown below. Restrict the selection to the Floor polys. |
||||||||||||||||||||||||||||||||||||||||||||||||||||||
 |
||||||||||||||||||||||||||||||||||||||||||||||||||||||
| 5) Drag the newly created texture icon to the right of the Carpet texture icon as shown. Mixed textures are additive textures and have to be placed to the right of the base texture. | ||||||||||||||||||||||||||||||||||||||||||||||||||||||
 |
||||||||||||||||||||||||||||||||||||||||||||||||||||||
| 6) With the FloorRadiosity texture tag still selected, generate UVW coordinates. (Texture-Generate UVW Coordinates) This step locks the texture to the floor polys. You're now done with the floor.
Next, make the Ceiling camera the active camera and repeat the above steps 1~6 with the Ceiling_radiosity image. Continue to repeat the process for all camera projections. Make sure that when you get to the walls you change the render resolution back to 2000x800. The Walls1&2Radiosity texture will be applied twice, once to Wall 1 and once to Wall 2. Once you've completed all the projections you're object manager should look as follows: |
 |
|||||||||||||||||||||||||||||||||||||||||||||||||||||
| The last step is to go through all the textures used in the room walls (Carpet, Brick, walls and the newly created radiosity textures) and turn off Receive Global Illumination. Hereafter the room will generate GI but won't receive it. Though you will still use radiosity, you won't get render artifacts on the room geometry, and the room won't receive radiosity, which will speed up your renders. | ||||||||||||||||||||||||||||||||||||||||||||||||||||||
 |
||||||||||||||||||||||||||||||||||||||||||||||||||||||
|
||||||||||||||||||||||||||||||||||||||||||||||||||||||
| Earlier we rendered the scene with full radiosity using the above settings. If we now render again with the same settings, using the Single Animation Solution, we find that the render takes just 185 minutes instead of 236 minutes. That may not seem like an enormous saving, but that is for just 20 seconds of animation. If you were making a longer film the savings in time could be huge. With scenes having more render intensive radiosity the savings will be greater, and equally important, the non baked scene shows bad artifacts that the baked scene will not suffer from. Click the link below to view the baked scene movie rendered using the settings shown above. As before, I've also made available the radiosity only version of the movie if you're interested. | ||||||||||||||||||||||||||||||||||||||||||||||||||||||
|
|
||||||||||||||||||||||||||||||||||||||||||||||||||||||
|
|
||||||||||||||||||||||||||||||||||||||||||||||||||||||
| Notice that the method of baking outlined here has the advantage of still using the non texture standard Cinema lights to illuminate the walls. The advantage of this is that you could have something pass in front of those lights and still cast shadows. For example you could have a moth flying in the lamp and you'd get the shadow of the moth. If you bake the full texture into the walls you will lose this option but see a marginal speed gain. | ||||||||||||||||||||||||||||||||||||||||||||||||||||||
|
|
||||||||||||||||||||||||||||||||||||||||||||||||||||||
|
The TVRoomBaked file has the baked textures and the bake cameras. Also added a 2nd, I hope more interesting, camera animation. Please send me any anions yomatiu make yourself.
|
||||||||||||||||||||||||||||||||||||||||||||||||||||||
 |
||||||||||||||||||||||||||||||||||||||||||||||||||||||
|
|
||||||||||||||||||||||||||||||||||||||||||||||||||||||
|
|
||||||||||||||||||||||||||||||||||||||||||||||||||||||