| Make sure the Puzzle Pieces group is still selected in the Object Manager and set new keyframes by hitting the record button in the Time Manager. You can now slide the time slider back and forth between the five and ten second point to scrub through the explosion. Try rendering a frame at the seven second point to see how the exploded pieces look rendered in mid explosion. |
| Next you want to make it so that the pieces don't just explode apart but they also fly past the camera. Select the Puzzle Pieces group in the Object Manager and then select the Move tool with only the Z axis activated. Place your cursor in the top view (upper right) and drag the entire group until you see all the pieces go past the camera in the camera view. Set new keyframes and test your animation again by scrubbing through it. |
| This tutorial goes into sufficient detail for a beginner to complete. My own progress in learning C4D was greatly assisted by the many fine free tutorials offered by enthusiasts who went before me. This tutorial is meant to return that favor by adding to the volume of information available on the web for learning C4D. Hope you enjoy it. My web site is at mvpny.com | |||||||||||||||||||||||||||||||||||
| Puzzle Tutorial | |||||||||||||||||||||||||||||||||||
 |
 |
||||||||||||||||||||||||||||||||||
|
Sample
|
Movies | ||||||||||||||||||||||||||||||||||
|
1.5MB
|
1.5MB
|
||||||||||||||||||||||||||||||||||
|
|
|
||||||||||||||||||||||||||||||||||
|
|
|||||||||||||||||||||||||||||||||||
|
The first thing you need in order to make an exploding puzzle is a spline puzzle. I know of no resource for such things so I made my own for a recent project using Adobe Illustrator. To download a Cinema file with the spline puzzle I built click the link above. Additionally, I have included a second spline puzzle kindly contributed by Jeff Carlson. If you make your own and wish to share it please send it along and I will make it available here.
|
|||||||||||||||||||||||||||||||||||
 |
|||||||||||||||||||||||||||||||||||
| If you download the above file you will find the 350 splines that make up the puzzle pictured above in a group object called Puzzle Splines. We want to extrude the splines into 350 separate, extruded objects. To do that we have to first create an Extrude NURBS. In the main menu bar, choose Objects-NURBS-Extrude NURBS. Your Object Manager should now look something like this: | |||||||||||||||||||||||||||||||||||
 |
|||||||||||||||||||||||||||||||||||
| Double click the Extrude NURBS icon to open it's dialog. There are two pages of dialog. Change the settings as shown below. | |||||||||||||||||||||||||||||||||||
 |
 |
||||||||||||||||||||||||||||||||||
| The above extrude settings will extrude each spline 10 inches deep with closed ends (caps) and a rounded edge bevel on top. (If you use Jeff's puzzle set the rounding radius to at most 1.1 in) It is important to choose Hierarchical so all the splines in the group will be extruded. Place the Puzzle Splines group inside the Extrude NURBS object. The extruded spline group should then appear. In quick shading mode it should look something like the picture below. | |||||||||||||||||||||||||||||||||||
 |
|||||||||||||||||||||||||||||||||||
| Next thing we want to do is make the puzzle pieces separate Extrude NURBS objects. To prepare for that, first choose the Puzzle Splines group and in the Object Manager and choose Ojbects-Expand Object Group. This expands the group so that the splines are direct children of the Extrude NURBS object. Next, choose the Extrude NURBS group in the Object Manager, and then back in the main menu bar, choose Functions-Current State to Object. This creates 350 separate Extrude NURBS objects, one for each spline. Your Object Manager should now appear as in the left image below: | |||||||||||||||||||||||||||||||||||
 |
 |
||||||||||||||||||||||||||||||||||
| To clean things up a little, drag the Puzzle Splines Group containing the ExtrudeNURBS objects to the root of the editor and delete the other, now empty objects. Your Object Manager should now look like the right hand image above. | |||||||||||||||||||||||||||||||||||
| Change the name of the group to Puzzle Pieces. Next you will apply a picture image to the puzzle. For illustrative purposes I have included in the Cinema file two materials, one with the MVP logo and one that says MVPNY.COM. | |||||||||||||||||||||||||||||||||||
 |
|||||||||||||||||||||||||||||||||||
| Load the MVP Logo material into the Material Manager by double clicking it. | |||||||||||||||||||||||||||||||||||
 |
|||||||||||||||||||||||||||||||||||
| As shown above, the MVPGasLogo is loaded into the image window of the color channel. You can keep this image or use one of your own. Notice the size of the image which in this case is 492x394 pixels. You will have to know the size of the image in order to correctly apply the material to the puzzle as a texture. | |||||||||||||||||||||||||||||||||||
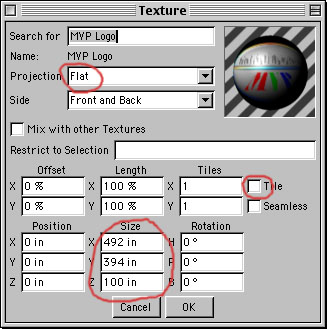
| Next apply the Material to the object group Puzzle Pieces and set your texture settings as follows: Choose projection type Flat so that the texture doesn't wrap around the pieces. Turn tiling off so the puzzle ends at the edge of the image. Enter the image size based upon the size of the image file in your material. (If you don't do this step the image will stretch to a square and the proportions won't be correct unless your image is perfectly square.) | |||||||||||||||||||||||||||||||||||
 |
|||||||||||||||||||||||||||||||||||
| Next we want to resize the texture mapping so it fits the puzzle. To do that we need to use the Texture Axis tool and the scale tool. Select these tools as shown below: | |||||||||||||||||||||||||||||||||||
 |
|||||||||||||||||||||||||||||||||||
| Set your display mode to bounding box (View-Display Mode-Box) in order to improve display speed and make it easier to see the texture box in the next step. With the texture axis tool and the scale tool selected, click the texture icon next to the Puzzle Pieces icon in the Object Manager and you will see a blue box representing the Texture we applied to the Puzzle Pieces. Drag the box to scale it larger until most of the puzzle is covered by the box as pictured below. Do a test render to see how the texture looks applied to the geometry. | |||||||||||||||||||||||||||||||||||
| You will notice that the part of the puzzle where the texture isn't applied renders white. We don't want to see that part, we want a clean edge, so we're going to create a transparent material and add it to the puzzle. In the material manager, choose File-New Material. Name that material Transparent. In the material manager, turn off all attributes except transparency, which should be turned on. Now add that texture to the Puzzle Pieces as shown below. The transparent textures mapping type doesn't matter, but the order of textures is important. Make sure that the transparent texture is first, and the Logo texture second. | |||||||||||||||||||||||||||||||||||
 |
|||||||||||||||||||||||||||||||||||
| If you render now you should come up with something like this: | |||||||||||||||||||||||||||||||||||
 |
|||||||||||||||||||||||||||||||||||
| Later on we want to explode the pieces apart so the we have to apply the texture to each piece, not just to the puzzle as a whole like it is now. Fortunately Maxon has given us a great shortcut that will save us from having to drag the texture to each of the 350 puzzle pieces. With the Logo texture selected in the Object Manager choose Copy Tag to Children (Object Manager-Tags-Copy Tag to Children) The texture is then copied to all the puzzle pieces with each one perfectly positioned so that all the puzzle pieces together form the puzzle image as a whole. Next copy the Transparent texture to the children in the same way. Your Object manager should now look like this: | |||||||||||||||||||||||||||||||||||
 |
|||||||||||||||||||||||||||||||||||
| Now when you explode the pieces in the next step the textures follow the pieces. This completes the modeling portion of this tutorial. Next comes the animation portion. | |||||||||||||||||||||||||||||||||||
| Animating the Explosion | |||||||||||||||||||||||||||||||||||
| Make sure that the camera included in the file is the active camera and switch to four way view. Adjust each view until your four way view looks something like the picture below. | |||||||||||||||||||||||||||||||||||
 |
|||||||||||||||||||||||||||||||||||
| Next is the process of making the pieces explode past the camera. To do this we need to create keyframes for the pieces in their current position, then new keyframes for the pieces in their exploded position. Using the Time Navigation bar at the bottom of the screen, set the time marker to the 150 frame (five second) mark. First we are going to set a keyframe for the camera. Make sure the move, scale, and rotate keyframe icons are activated, and deactivate the Points keyframe icon as shown: | |||||||||||||||||||||||||||||||||||
| Select the camera in the Object Manager and record a keyframe. This creates sequences and sets keyframes for the camera for position, size and direction. | |||||||||||||||||||||||||||||||||||
| Now to set the keyframes for the puzzle. In order to record keyframes for all the pieces at once, you have to turn on Record Hierarchical (it's the button next to the P {points} button) as shown: | |||||||||||||||||||||||||||||||||||
 |
|||||||||||||||||||||||||||||||||||
| Next, select the puzzle group called Puzzle Pieces in the Object Manager and then hit record in the Time Manager. Check the timeline to make sure keyframes were set and then drag the time marker to the ten second point. | |||||||||||||||||||||||||||||||||||
| Now we are going to set the exploded position of the puzzle pieces by using the 'Randomize" command. Select the Puzzle Pieces group in the Object Manager and then choose Randomize from the Functions menu. The following dialog will open. Please set the values as displayed. | |||||||||||||||||||||||||||||||||||
 |
|||||||||||||||||||||||||||||||||||
| These settings will move all objects by a random number falling within the parameters set in the Move settings, and will rotate all objects by a random degree falling within the Rotate parameter settings. Click OK and you will see the pieces scattered as shown below: | |||||||||||||||||||||||||||||||||||
 |
|||||||||||||||||||||||||||||||||||
 |
|||||||||||||||||||||||||||||||||||
| Lastly, you can make one of the pieces stop in front of the camera like in my example by removing a piece from the group and positioning it in front of the camera where you want it to stop. Turn it so you see the backside of it and texture it to taste. Set your last keyframe, add some spot lights here and there for dramatic impact and you're done. | |||||||||||||||||||||||||||||||||||
| Oops, one more thing. You can use the five seconds before the explosion to animate your camera. Go to the top of the sequence, move the camera into a starting position of your choice and add a keyframe. The camera will move from that position finishing at its resting position just as the explosion starts. Happy rendering. | |||||||||||||||||||||||||||||||||||